Table of Contents
-
How To
-
Make PostgreSQL run faster
Please see this tutorial or this Wiki: Tuning PostgreSQL.
Before making any changes to your PostgreSQL configuration please make a backup of the "C:\Program Files\PostgreSQL\8.3\data\postgresql.conf" file - if you make the wrong changes it can make performance worse and you may want to revert to the original settings.
-
Update PostgreSQL - same Major version
PostgreSQL is a third party database application and is continually being updated. Versions 8.2 onwards are supported by PT3, but 8.3 or 8.4 is recommended.
Update: 9.0 has a 64-bit version and will give better performance if you have 64-bit Windows.
Although this is not yet (at the time of writing) officially supported quite a lot of people are using it, including several PokerTracker staff, and it seems to be stable.When PT3 was launched 8.3.4 was in use but since then several issues have been fixed and performance has been improved, so if you are using 8.3.x but lower than 8.3.9 you should update to the latest 8.3.x version available.
The same applies to updating 8.4.x - at the time of writing 8.4.4 is current and working fine, but if you have one of the early versions (less than 8.4.2, say) I would suggest updating.
This guide only explains how to update within the same major version 8.3.x to 8.3.y (or 8.4.x to 8.4.y) - updating from 8.3.x to 8.4.y is a much more involved process.
Do NOT update from 8.3 to 8.4 using these directions - it will not work!
-
Before you start use the backup tool in PT3 to backup your databases.
In the case of any problems during the upgrade process this is vital so that you are able to recover your databases. You should make regular backups of your databases, as you would for any important data.
It might also be a good time to archive your PokerTracker 3\Processed folder, too, so that you have a copy of the original hand history files if you ever need to recreate your database.
Close PT3. -
Go to the PostgreSQL Download page and click on your operating system in the "Binaries" section.
On the following page click the download link.
If you are using PostgreSQL 8.3 as installed by PT3 use the PGInstaller. Do NOT use the One Click Installer. The pgInstaller is not available for later versions so you can only choose the One Click Installer for those.
Click on the latest version (highest .x number) of the major version you are using (e.g. the highest 8.3.x version if you are using 8.3) and then on the link for your operating system.
Click to download the main installer version - this will have a filename like "postgresql-8.3.11-1.zip". Save this file to your computer. - Unzip those files to their own folder. (Right-click unzip to folder usually works or use the wizard built-in to Windows.)
- Before proceeding make sure steps 1 and 2 are completed.
-
Double-click the "UPGRADE.BAT".
It will run at least two installers and both of them require a click or two. Just click "Next" or "Finished" until they are both complete.
If the updgrade.bat fails for any reason you will need to follow the directions to uninstall and re-install PostgreSQL in the Documentation. This will not lose any data so is perfectly safe. - Reboot when asked.
-
Upon reboot run PT3 and do full Database > Housekeeping with all 6 options ticked, for all databases.
This will take some time for large databases so please schedule accordingly.
You may want to run it overnight, for instance, if you have very large databases.
-
Before you start use the backup tool in PT3 to backup your databases.
-
PostgreSQL on a networked computer
Please note: if you are not behind a router, this will not work for you.
There may come a time where you want one database that two computers share within the same local network. This is fairly simple, but to make sure I have written this tutorial to assist those who need help in this matter.
First we need to know about how your network is setup. Go to a command prompt and type ipconfig (on Mac or linux type ifconfig in a terminal).
You will see all your physical connections to the internet here. We are interested in the IP addresses of these connections. They should start with 192.168, but most importantly we are worried about the 3rd number in the ip address. Is it a 1 or a 0? If it is a zero follow step A below. If its a one, follow step B below.The general overview is to update your configuration files to let the server know that computers in your same subnet are allowed access to the server. To do this, goto Start -> Programs -> PostgreSQL-> Configuration Files -> pg_hba.conf. Scroll to the bottom of the file. You will see something similar to this at the bottom:
# TYPE DATABASE USER CIDR-ADDRESS METHOD
# IPv4 local connections:
host all all 127.0.0.1/32 md5
# IPv6 local connections:
#host all all ::1/128 md5
Step A) simply add the line below to the bottom of your document:
host all all 192.168.0.0/24 md5
Save and exit.
Step B) simply add the line below to the bottom of your document:
host all all 192.168.1.0/24 md5
Save and exit.
To make these changes on Mac you need to change permissions on the /Library/PostgreSQL/8.4/data folder (note: not ~/Library).
Right click the data folder and choose "Get Info". At the bottom of the info window change permissions to Read & Write for "everyone".
You can then make the changes to the config files, which are in the "data" folder.
After you edit the config files you MUST change the permissions back to No Access for "everyone".Now, go back to Start -> Programs -> PostgreSQL -> Configuration Files -> postgresql.conf and add the following line to the end of the file:
listen_addresses = '*'
This tells your server to listen to ALL addresses your computer has, not just localhost (which is only accessible from the local computer).
Once saved, your computer will now send SQL results to computers in your local network. To connect to that server remotely, you need to know that server's address. Goto Start -> Run -> command and click OK. Now type ipconfig and look for the ip address of your computer. If you have more than one reply, choose the one that says "local area connection". Mine looks like this:
Windows IP Configuration
Ethernet adapter VMware Network Adapter VMnet8:

Connection-specific DNS Suffix . :
IP Address. . . . . . . . . . . . : 192.168.63.1
Subnet Mask . . . . . . . . . . . : 255.255.255.0
Default Gateway . . . . . . . . . :

Ethernet adapter VMware Network Adapter VMnet1:

Connection-specific DNS Suffix . :
IP Address. . . . . . . . . . . . : 192.168.226.1
Subnet Mask . . . . . . . . . . . : 255.255.255.0
Default Gateway . . . . . . . . . :

Ethernet adapter Local Area Connection 2:

Connection-specific DNS Suffix . :
IP Address. . . . . . . . . . . . : 192.168.1.16
Subnet Mask . . . . . . . . . . . : 255.255.255.0
Default Gateway . . . . . . . . . : 192.168.1.254
My IP address here is 192.168.1.16, so my server's ip address is the same. Therefore, to log into this database from my other computers in the house the server:port:pass is - 192.168.1.16:5432:dbpass. Substitute your information to access your database from another computer in your local network. Also, if you have removed password authentication from your server, please substitute "trust" for "md5" in the line you are adding to your pg_hba.conf file.
See also this well-written post by Geert: PT3 on a Mac / PostgreSQL on a server (useful for non-mac setups too).
-
PostgreSQL on a separate drive
Details in this topic, or this one.
An alternative is to install PostgreSQL on another drive. You need to fully remove PostgreSQL from your PC (see below), then install to your chosen drive.
-
PostgreSQL on a hotswap drive
This guide is to help an individual set up their database on a hot swappable hard drive.
By doing this, you can take your hard drive with you to another computer and use the same database. This gets around the networking issues some have with PostgreSQL and allows you to use your database outside your local network.This guide assumes you already have PokerTracker 3 installed on two computers but have separate databases for the two installations. It is written from the point of view of a Vista user, but it does tell some of the similarities of XP and Vista.
Before you start please make a backup of your database(s) and store it somewhere safe.
-
Prepare the hotswap drive
Go to Start -> Computer.
You will come to this window many times in this part of the guide (we’ll call it the “My Computer window”).
Right click on your Hotswap drive and choose Rename and give it some name in reference to the fact it’s your database (for instance, I named mine pg_8_3_4).Go back to the My Computer window, right click on your Hotswap drive and choose Format.
Make sure it is set to NTFS and a block size of 4096.
Choose Quick Format, then click on Start.Now, we need to assign this a drive letter that is available on both computers.
Go to Start -> right click on -> Computer -> Manage.
Now click on “Disk Management” .
Right click your hotswap drive and choose Change Drive Letter and Paths.
Click on Change…, then click on “Assign the following drive letter “ and select “P” from the drop down menu (P is for PostgreSQL in this case). Ignore the warning (yes, you want to continue). -
Uninstall PostgreSQL
Go to Start -> Control Panel.
Select Programs and Features (Add/Remove Programs for XP).
Wait for this list to populate.
Right click on PostgreSQL and choose Uninstall.
Take a note of the version number you see.In Vista, click on Start -> All Programs -> Accessories -> right click on -> Command Prompt -> Run as Administrator.
In XP, just click on Command Prompt in the same Start folder you have.
At the command prompt type net user /delete postgres.
If it did not say “The command completed successfully” then you did not do this step correctly (which is important).If you get something along the lines of “user access denied”, in Vista this means you are not running the command prompt as an administrator, try running the command prompt in administrator mode again.
If in XP, you probably are using a limited account to do this. You need to change accounts to an administrator account. Once completed type “exit”.You can now go to Start -> Computer -> C: -> Program Files -> right click on -> PostgreSQL -> Delete.
Before doing this make sure you have all your data backed up and secured. -
Download and install PostgreSQL
Go to here, or to whatever version of PostgreSQL you wish to install - you should generally get the lastest version within the same major update as you were already running; for instance if you had 8.3.4 before you could install 8.3.8 now - (Postgresql 8.3.4 Download) and get PostgreSQL.
Once downloaded, extract EVERYTHING to a temp folder, double click on postgresql-8.3. If you get an error that says, “please use the main MSI file”, you double clicked on the wrong one. Try the other install file you see.When you get to this screen, select browse and install it on your P: drive at P:\PostgreSQL\8.3 (click on the new folder icon in the upper right to create a new folder).
Click on next, then click on it again. It will tell you it generated a random password.
Ignore this, click on OK and you will be presented w/this screen: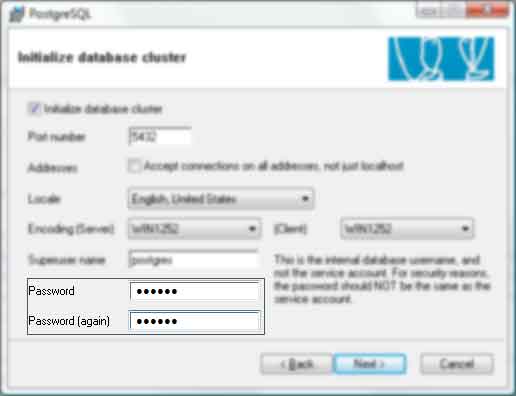
Choose the password dbpass for the two boxes highlighted here. Now click on next until it installs.
-
Restore Databases
Restore your backed up databases using the same method that you used to backup.
-
PostgreSQL shutdown and startup
It is time to move to the other computer and get it synched up to this hotswap drive.
You will and MUST do this EVERY TIME you move the hard drive from one system to the other or you risk losing the database server.
On your main/first computer:
Close PT3, then go to Start -> right click on -> Computer -> Manage.
Go to Applications and Services -> Services.
Find PostgreSQL in the list, right click -> Stop Service. You may now safely remove your hard drive.When you move the hard drive from one computer to the other, you always must stop the PostgreSQL service before unplugging the hard drive.
You should also make sure the PostgreSQL service is NOT running on the other computer before you attach the hotswap drive.
When you have it plugged into the new computer, start the PostgreSQL service there.
To do this, go to the same place you went to stop PostgreSQL, but select Start Service instead of Stop. -
2nd Computer
If PostgreSQL was installed on this computer, follow the guide to uninstall it.
Now plug in your hard drive and go through the steps here to change it to drive P: as you did on the first computer.
Now download postgresql 8.3.4 again.
Run the installer on the new computer, and again set it to install to P:\PostgreSQL\8.3.
Again let it create the password for the service, but when it gets to the screen where you would put in the password “dbpass”, UNCHECK INITIALIZE DATABASE. Let it install.Once installed, go to Start -> Computer -> C: -> Program Files -> Pokertracker 3 -> Data -> Config and edit the Pokertracker.cfg file here (like you did on the first computer).
Remove all database information from it and save it.Now run PT3.
When the configuration screen comes up to configure PostgreSQL, make sure you have in the correct password (“dbpass”). Click on connect.
Now it wants to create a database.
Check “This Database Already Exists”, then click on Browse. Select your database, then click on connect.You now have the same database at your disposal on each computer!
Remember to shut down the PostgreSQL service when moving your hard drive or it will fail!!!
When you plug it into the new computer, remember to start the service (click on Start -> Programs -> PostgreSQL -> Start Service).
-
-
-
Problems
-
Unable to login to database
- If you get an error message which looks like this:
unable to login to database (PT3_xxxx_xx_xx_xxxxxx) - reason:could not connect to server:connection refused(0x0000274D/10061) Is the server running on host "localhost" and accepting TCPT/IP connection on port 5432?
The first thing to try is to restart the PostgreSQL service.
Start -> Programs -> PostgreSQL -> Start Service.If this doesn't help, try a reboot.
You can also try stopping the service (Start -> Programs -> PostgreSQL -> Stop Service), running a search on your computer for postmaster.pid and then deleting that file, then restarting the service and see if that helps.
Note that you may need to turn on 'View hidden files and folders', and the file should be in the folder './Program Files/PostgreSQL/<version>/data'
- If you get an error message which looks like this:
unable to login to database (PT3 DB). Reason: FATAL: no pg_hba.conf entry for host "::1", user "postgres", database "PT3 DB", SSL off
Edit the pg_hba.conf file.
In 8.3 you can access it via Start > Programs > PostgreSQL > Edit pg_hba.conf, but otherwise you will need to find the file in Windows Explorer - it is in the "data" folder under your PostgreSQL installation.
In Vista or Windows 7 you need to open Notepad using Run As Administrator in order to be able to save your changes.Scroll to the bottom, and add this line exactly as you see it here:
host all all ::1/128 md5
Then save and exit the file, and Start > Programs > PostgreSQL > Reload Configuration and things should then work properly.
-
Trouble installing or running PostgreSQL
Often problems with installing, running or networking PostgreSQL are permissions issues caused by security software so please check our Firewall Troubleshooting Guide to make sure you have things configured correctly to allow PT3 and PostgreSQL full access.
-
Will not connect - wrong user or password
The default user is 'postgres' and password 'dbpass' (no quotes), so try that unless you changed it yourself.
If you already had PostgreSQL installed on your computer before using PT3 then you will need to use the password which was set up when it was installed. For example if you have tried another tracker try the password 'postgrespass'.
If you can't remember your password, or can't get it to work, you can configure PostgreSQL to not require a correct password by following these steps:
Don't worry, passwords are still required for server access from anywhere besides your local computer.
-
In PostgreSQL 8.3 go Start > Programs > PostgreSQL > Configuration Files > Edit pg_hba.conf (see image below).
In Vista or Windows 7, you have to edit pg_hba.conf in Administrator mode or the save will fail (right click the file and select Run as Administrator).
-
In PostgreSQL 8.4 you need to open the file manually in Notepad.
In Vista or Windows 7 you must run Notepad in administrator mode. Click Start and type "notepad" into the search box. Right click "notepad" and choose Run As Administrator.
In Notepad open the following file (Notepad menu File > Open):
c:\Program Files\PostgreSQL\8.4\data\pg_hba.conf
Tip! Because it is not a .txt file you will need to make sure that "All Files" is selected instead of "Text Documents".
Scroll to the bottom of the document and in both places you see the word 'md5', replace it with 'trust'.
Save and exit.
Then go Start -> Programs -> PostgreSQL -> Reload Configurations
This will allow you to access the database without any password.
-
In PostgreSQL 8.3 go Start > Programs > PostgreSQL > Configuration Files > Edit pg_hba.conf (see image below).
-
Unable to import hand
- If you see an error that looks like this:
Unable to import hand (#18202934050). Reason: Unable to execute query: COPY tourney_holdem_hand_summary FROM STDIN;; Reason: Fatal Error (ERROR: could not read block 0 of relation 1663/16438/16742: Invalid argument CONTEXT: COPY tourney_holdem_hand_summary, line 1: "54551 100 736 3 971 18202934050 2008/06/17 20:55:42 2008/06/17 17:22:44 9 2 2 2 1500.00 1500.00 1500..." )
..or this:
Unable to import hand (#7651813545). Reason: Unable to execute query: COPY holdem_hand_player_statistics FROM STDIN;; Reason: Fatal Error (ERROR: index "hhps:idx5-id_session" contains unexpected zero page at block 0 HINT: Please REINDEX it. CONTEXT: COPY holdem_hand_player_statistics, line 1: "70112 696 696 0 2 8819 2008/08/15 04:05:59 8 f f 0 f 0 f f f f f 0 f 0 t f f t f 0 f 0 t f t t f 0 f..." )
There are two main reasons for this kind of error.
The first is a result of data corruption from a computer crash that requires reindexing your database.
You can reindex your database from the Database > Database Management window. Select the affected database(s) and enable the ReIndex Database option in addition to the defaults.
The second reason for this error is a result of faulty hardware.
You can set PostgreSQL to ignore these errors by clicking Start --> Programs --> PostgreSQL --> Configuration Files --> Edit postgresql.conf.
In the configuration file that appears, go to the bottom of the file and add the text “zero_damaged_pages = on” on a new line and then save and close the file.
Click Start --> Programs --> PostgreSQL --> Reload Configuration and PostgreSQL will ignore the damaged data.
If you continue to have problems with that hard drive, you should consider replacing it.
-
-
Backup and Restore in PGAdmin
PT3 has backup and restore functionality built in, so in normal use you do not need to use these directions - they are left here for reference only.
-
PGAdmin Backup
- Open PGAdmin: Start -> Programs -> Postgres -> PGAdmin III.
-
Double click "PostgreSQL Database Server" to connect. If it asks for a password, the default is "dbpass" (no quotes).
Open (Click the + next to) PostgreSQL Database Server, then Databases. -
Right click the database you want to back up, and select "Backup...".

-
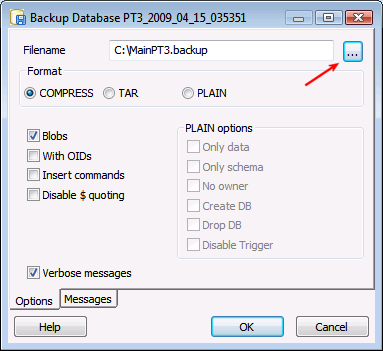
On the Backup Database window choose the filename of the backup file and where you want to save it.
You can either type the path and filename or click the browse button ( "..." ) to the right.
-
Click "OK" - no other options need to be changed.
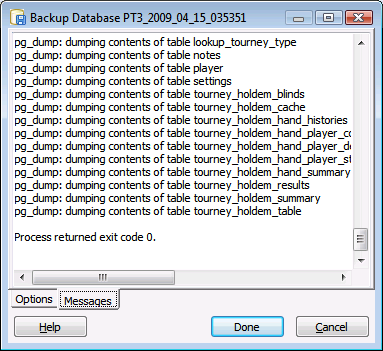
The backup should complete successfully and you will see "Process returned exit code 0."
-
PGAdmin Restore
-
First we have to create a new database.
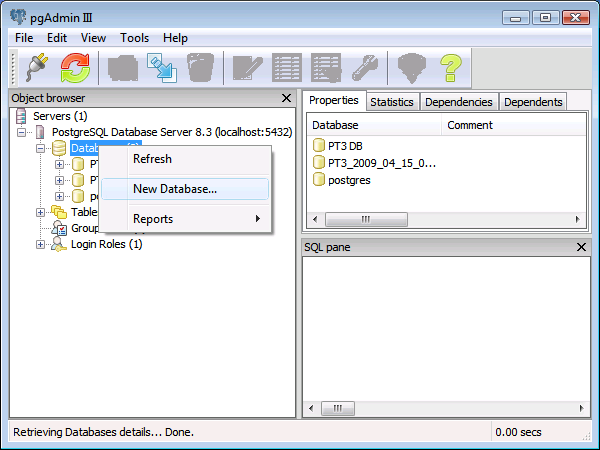
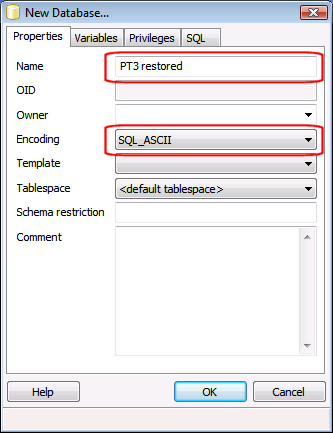
In PGAdmin right click "Databases" and choose "New Database...".
-
On the New Database window enter a name and set Encoding to "SQL_ASCII".
Click OK and the database will be created.
-
We can now restore the backup into the new database.
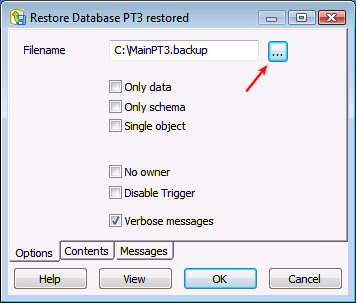
Right click the new database and select "Restore...".

-
On the "Restore Database" window enter (or browse to) the backup file we created earlier.
-
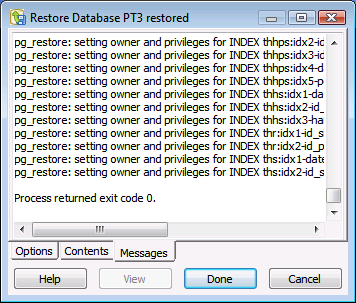
Click "OK" and the database will be restored - no other changes need to be made.
The restore should complete successfully and you will see "Process returned exit code 0."
-
First we have to create a new database.
-
Using a restored database in PT3
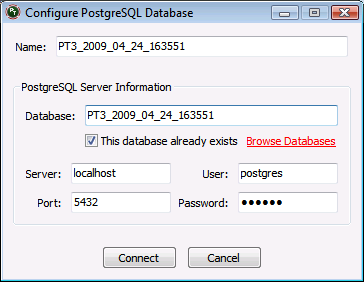
- Open the Database Management window (Database > Database Management) and click "New".
-
Enable the option "This database already exists" and click "Browse Databases" to select the newly created and restored database.
-


